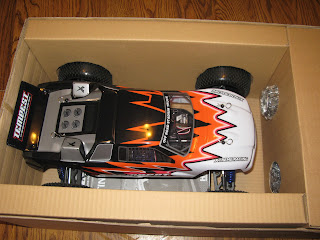
I was searching for a 1/10 4x4 electric stadium truck and not really coming up with anything. There are a few choices out there for nitro and even fewer for electric. I eventually came across the Tempest by hobby people. I am not sure who really make this but I think that it is a himoto. That's not really important because hobby people carries a full line of replacement parts. Hobby people offers the vertex and tempest the vertex is a entry level truggy and the tempest is the brushless version with a few upgrades. The most important thing to remember is the price. At $200 the tempest is a great value and the vertex at $120 is just as good. I decided to go with the tempest for the brushless motor.
It took about a week for the truck to arrive at my door. After opening the box and taking a good look at what we had I was so far pleased. The included charger will get you going but I had a peak charger so I just used that. I charged the battery and put AA in the transmitter and headed for the track. The truck runs great and drives really good. The truck took off good with the included battery and puled hard once it got going. The acceleration was ok it seems to take off slow for one to two seconds before full throttle is applied. Cornering is good and it jumps well. The two biggest problems that I see on day one is the esc lacking the ability to set profiles and the body.
Here's what I like
Brushless motor
aluminum drive shafts
good tire pattern
Great price
Nice feel controller
What could be improved
The body looks good but is very flimsy
programmable esc (to adjust take off, brakes and a lipo cut off)
higher capacity included battery
A 2.4 radio over the included AM
Check back later when I give an update as to how it is holding up.
Update: Well after some pretty hard runs the truck is holding up good. I did strip the gears out of the servo. No big deal I just replaced it with a good metal gear servo and should have no more problems. Had some clearance issues with the linkage but I just grinded a little plastic and set the end points.
Rhino's RC
RC Car and Truck Endeavors
Saturday, March 19, 2011
Sunday, February 27, 2011
Save your receiver and repair that broken antenna wire
At one point or another you may find yourself with a receiver wire that gets broke. The reasons this happened is not important when it happens to you. So instead of buying a new receiver just replace your wire. Here is how its done.
Then pop out the circuit board .
Then take your soldering iron with the needle tip and remove the broken wire.
First you need to open up the case. You may have to remove some screws and then carefully pop it open.
Then take your soldering iron with the needle tip and remove the broken wire.
Then just feed the new wire throw the hole and solder it to the board. Once done reinstall the board and feed the wire through and close case. Its just that easy.
Sunday, February 20, 2011
How to get your engine to breath a little easier
Nitro engines are great with the smoke and the sound but they do require a little maintenance. One item that often gets over looked is the air filter. So a good clean up will help it breath better and get it preforming better. Cleaning it is really not that hard so lets take a look at how we can clean it.
Wow this filter is really dirty. The first thing that we need to do is remove the filter. I also removed the filter housing to clean it as well.
You will need a zip lock bag and some nitro fuel.
Place the filter in the bag and add nitro fuel to cut the dirt. You may need to do this several times to get it clean. You only need to get the worst of it in this step. We will get the rest in the next steps.
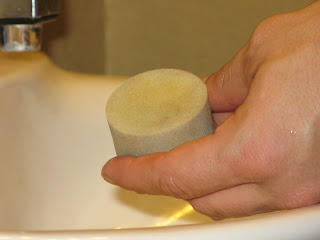
Just use warm water with soap and a sponge to clean the housing.
Use warm water and soap and work the filter until its clean.
Once the filter is clean just let it dry.
Place filter in a bag and soak it with filter oil. Be sure to work it into the whole filter. Once you have that done use a paper towel to get rid of the excess.
All that is left is to reinstall it in the housing and place it back on your carburetor. Be sure to use a zip tie to hold it on. Your engine can now breath better and hopefully giving you the performance you want.
Wow this filter is really dirty. The first thing that we need to do is remove the filter. I also removed the filter housing to clean it as well.
Use warm water and soap and work the filter until its clean.
Once the filter is clean just let it dry.
Place filter in a bag and soak it with filter oil. Be sure to work it into the whole filter. Once you have that done use a paper towel to get rid of the excess.
All that is left is to reinstall it in the housing and place it back on your carburetor. Be sure to use a zip tie to hold it on. Your engine can now breath better and hopefully giving you the performance you want.
Friday, February 18, 2011
Getting into RC
The most important thing to know when getting into RC is what am I going to do with it. Some want to race some just want to see how fast they can go and others want to climb things or something in between. Knowing what your going to do will determine what type of car you should get. Then you must decide how much your willing to spend and what your skill level is. The basic would be an electric 2wd vehicle to just keep things simple. A 4wd vehicle may cost more but may meet your needs better and then last longer. Check out your local hobby shop they may also be able to help you. Above all else remember this is to be fun and we need to not overreach and buy a pure racing machine to drive in the backyard. This will cost you a ton and most likely put you out of the hobby after spending to much. There are alot of cross over cars and trucks that make great bashers and good racers so be sure to check them out. If you need help just ask and have fun.
Saturday, February 12, 2011
Hpi Mt brushless conversion review
The first time I ran the truck the tire came unglued and stopped my testing with that but with the first pull of the trigger I just smiled. Once the tire was glued I made several runs and was very pleased. After about ten runs it started to make a clicking noise. I was not sure where it was coming from. After inspecting it I noticed that I had one bent drive shaft so I replaced it hoping that it would be the noise I was hearing. With just a little time back on the track the noise was back and it was back to the bench. After allot of looking I determined it was the rear end. I Took it apart to see the gear shaved bad. I did a little research to find that this is a common problem so I ordered a heavy duty gear set. This solved the problem. Next I was having trouble keeping the battery in place and ultimately ruined a battery by it rubbing a bolt and causing a bulge. I ordered a battery holder and then mounted it. After many more runs I bent the other front drive shaft so I replaced it. I came across a MT 2 and upgraded my truck to a MT2 and have not had any problems since.
Here is a parts list
EZ run 9T with 35amp ESC
hyper mini 11T mod 1 pinion
hyper mini Velcro straps
hyper mini battery holder
stock plastic (post cap)
stock aluminum
Final thoughts
After a full season of running this I am very pleased. This is a great truck and with just a few upgrades this truck is very tough and is now my favorite truck.
Here's are some pictures of it in its final form.
Monday, February 7, 2011
Tips
One of the most important things to do is not throw anything away. You never know when you will need parts. Servos, esc, scrap body pieces even the parts tree could be used for something. Keep your mind open and get a good parts bin. I used the fan off of a bad esc and a servo wire to make a motor fan. The total cost for the project was $.05. The cost of some zip ties.
Saturday, February 5, 2011
Hpi MT brushless conversion
I got a hpi mt in a lot and thought that it would make a great electric truck since there is little choice for an electric 4x4 stadium truck. It had no motor an no upper deck so I will walk you through the process that I took in making it a brushless MT.
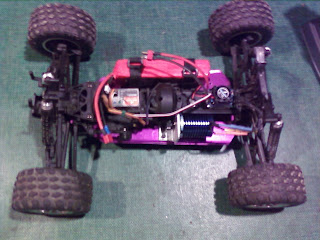
The next thing is to work on the layout of all the electronic and figure out where to put everything. The first thing I decided was to locate the motor on the other side as where the nitro engine was. I did this because of space and the layout of the steering servo. So you will need to rotate the center diff. Not a big deal but you will need to drill out the holes to mount it. I lined up two holes and then drilled the other two. Here's a mock up of how things are going to look.
Next it is time to make the upper decks. I first thought to make them out of metal but decided to use plastic for weight savings. I found a left over part in my bins and cut it down to fit above the rear drive shaft. I also used a battery holder left over from a rock crawler. I also cut down the stock piece for the front mount.
The only thing left is to mount the motor. I got a piece of angle aluminum and cut for a mount. It worked ok I don't have a CNC machine so I cut it with a dermal so its kinda hack but works good. Had to get a mod 1 pinion for the motor and then just install and paint body.
The next thing is to work on the layout of all the electronic and figure out where to put everything. The first thing I decided was to locate the motor on the other side as where the nitro engine was. I did this because of space and the layout of the steering servo. So you will need to rotate the center diff. Not a big deal but you will need to drill out the holes to mount it. I lined up two holes and then drilled the other two. Here's a mock up of how things are going to look.
Next I need to mount the servo. I used some simple mounts from another kit. I think its from a duratrax evader. I also need to strengthen the chassis so I got some plastic from the local hardware store (a post block mount) to cut up to make a plate. I screwed it to the existing upper deck and the center differential. This really made the chassis more ridged.
Time to test it. Check out the review
Subscribe to:
Comments (Atom)


